How Do You Weave Foil and Latex Balloons Together for a High-Impact Display?
Struggling to make your foil and latex balloon creations look professional? Your mixed displays might seem disjointed. I can help you weave them together for a stunning, cohesive look.
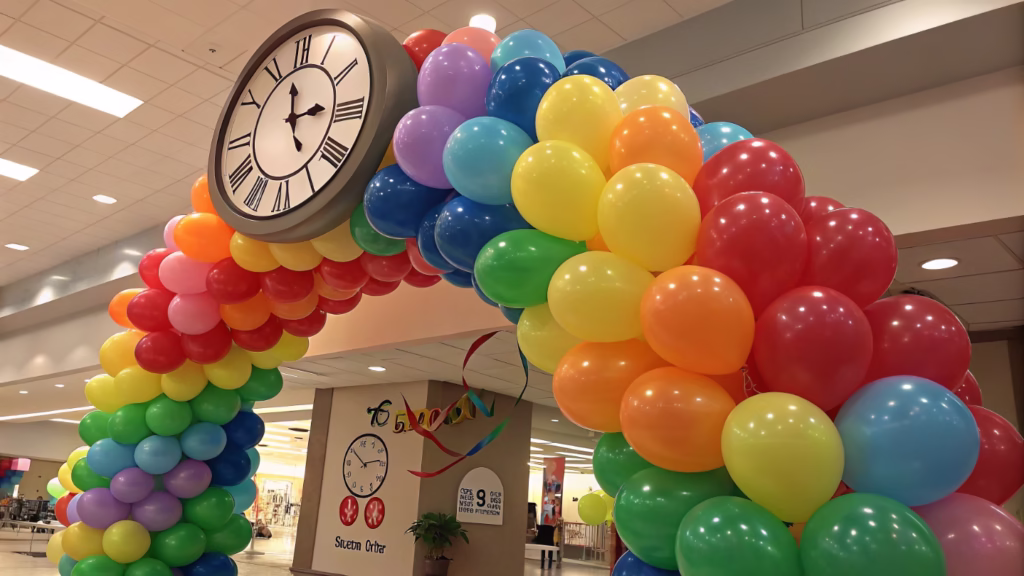
To combine foil and latex balloons, first create a latex balloon garland base. Then, securely attach the foil balloons using either 260Q twisting balloons1 as ties or balloon glue dots2 for direct adhesion. This method ensures the foils integrate seamlessly, creating a professional, multi-textured, and high-impact design.
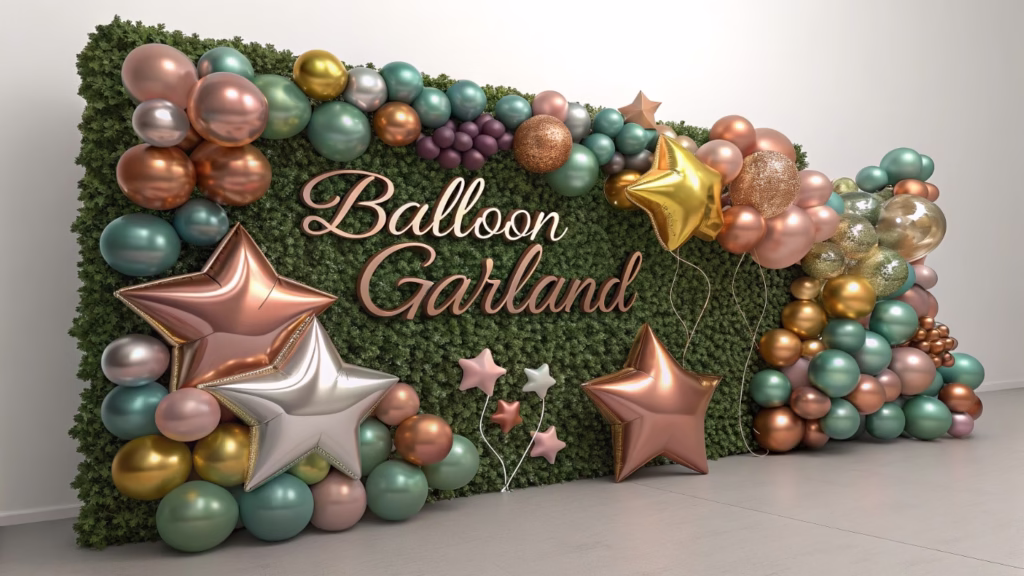
That's the basic idea. But creating a display that truly wows your clients requires more than just tape and hope. As a procurement manager, you know that the details make the difference between an amateur setup and a professional installation. The right tools, a secure attachment technique, and an eye for design are what separate the best from the rest. Let's dive into the specifics that will elevate your balloon arrangements from simple bunches to breathtaking art pieces3. Ready to master this skill?
What are the essential tools and supplies for professional balloon weaving?
Starting a project without the right tools is incredibly frustrating. You want a professional result but end up with popped balloons4 and a messy look. Here’s how to get prepared.
For professional balloon weaving, your essential kit must include: high-quality latex and foil balloons, an electric inflator5, 260Q balloons for tying, and balloon glue dots. You will also need scissors and a clear line, like fishing line6, to create a strong, invisible structure for your garland.
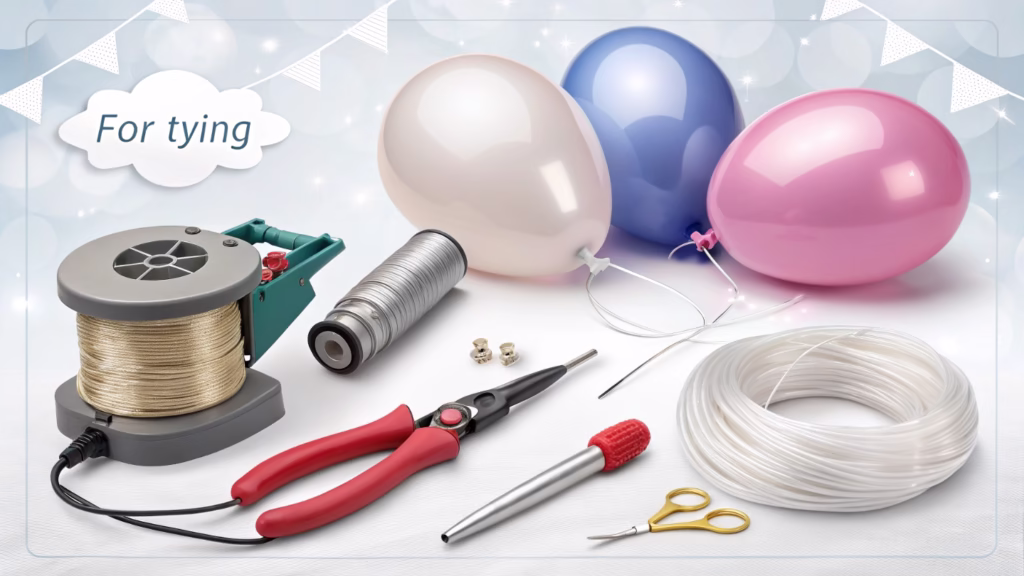
Having the right equipment on hand is the first step toward a successful and stress-free project. As someone who has overseen countless productions, I can tell you that quality inputs lead to quality outputs. A well-stocked toolkit not only saves time but also ensures the final display is durable and looks polished. It’s about working smarter, not harder.
Your Professional Balloon Weaving Checklist
To build impressive mixed-media displays, you need more than just balloons. Each tool has a specific purpose that contributes to the final structure and aesthetic. Below is a breakdown of what I consider non-negotiable for any serious balloon artist or large-scale event planner.
| Tool/Supply | Purpose | Why It's Essential |
|---|---|---|
| Electric Inflator | Rapidly inflates latex balloons | Saves hours of labor on large garlands and ensures consistent sizing. |
| High-Quality Balloons | The core material (Latex & Foil) | Reduces popping and ensures color consistency7 and longevity. Look for reliable suppliers. |
| 260Q Balloons | Tying and connecting elements | Their strength and flexibility are perfect for securely attaching foils to latex bases. |
| Balloon Glue Dots | Adhering balloons together | Essential for placing foils precisely and filling gaps without visible ties. |
| Fishing Line/Dacron Line | Creating the garland structure | Provides a strong, nearly invisible backbone for your latex garland. |
| Scissors | Cutting line and trimming | A basic but crucial tool for clean cuts and finishing touches. |
How do you securely attach foil balloons to an organic latex garland?
You've built a beautiful latex garland, but the heavy foil balloons won't stay put. They droop or fall off, ruining the entire effect. Let's fix that problem.
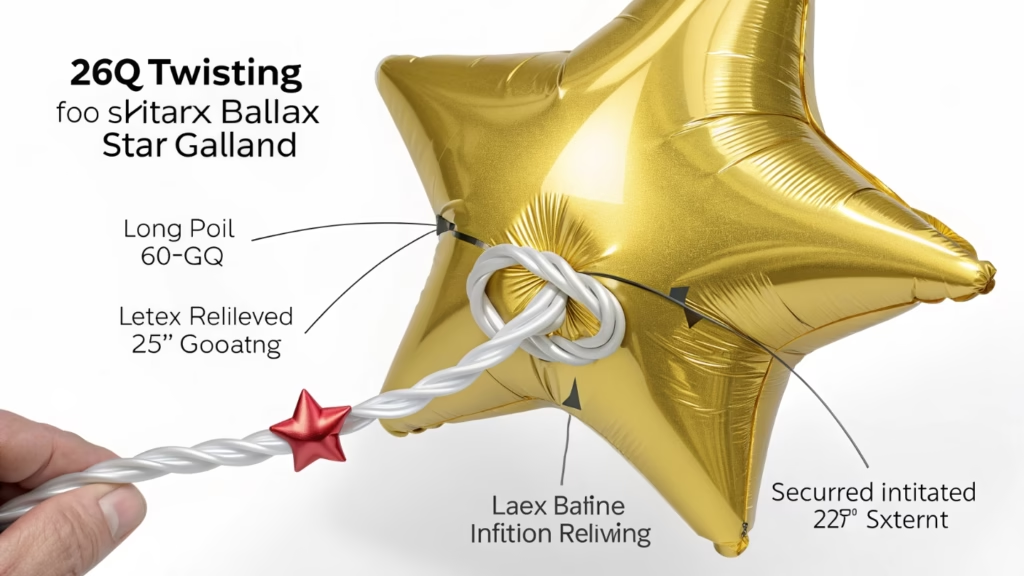
Use a 260Q balloon as a secure tie. Wrap it around the foil balloon's inflation tab or neck, then twist that 260Q deep into a latex cluster. For a faster, cleaner method on lighter foils, use several balloon glue dots to adhere the foil directly onto the latex balloons.
Choosing the right attachment method depends on the foil balloon's size and weight, as well as the look you're trying to achieve. One method provides industrial-strength security, while the other offers speed and a seamless appearance. In my experience, knowing when to use each technique is key. I've seen many event setups where a simple shift in attachment method could have prevented a display from failing mid-event. Let’s explore both so you can make the best choice for your project.
Method 1: The 260Q Wrap
This is my go-to for heavy or large foil balloons. It's the most secure method and ensures your focal pieces won't shift.
- Inflate a 260Q balloon, leaving a small tail.
- Fold the 260Q in half and wrap it tightly around the foil balloon’s inflation tab.
- Treat the two ends of the 260Q like a single cord.
- Find a dense cluster in your latex garland and push the foil balloon into place.
- Separate the 260Q ends, wrap them around different latex balloons within the cluster, and tie them together securely at the back.
Method 2: The Glue Dot Technique
This method is perfect for smaller, lighter foils or when you need a quick, invisible attachment.
- Identify the contact points where the foil balloon will rest against the latex garland.
- Apply several balloon glue dots to the back of the foil balloon at these key points. More is better for a secure hold.
- Firmly press the foil balloon onto the latex garland, holding it for a few seconds to ensure the adhesive bonds.
- This works best when the foil can rest on multiple latex balloons, distributing its weight.
What design principles create balance between foil and latex elements?
Just mixing different balloons can look messy. Your display feels cluttered and lacks a clear focal point, making it hard for people to appreciate your work. This is a common design challenge.
To create balance, use the 'Rule of Threes8' for color and shape. Designate your largest foil balloons as clear focal points. Then, frame them with clusters of varied-size latex balloons (e.g., 5", 11", 18") to add depth and guide the viewer's eye through the arrangement naturally.
Design isn't just about putting things together; it's about telling a visual story. When I'm consulting on a large retail display, I always emphasize that every element must have a purpose. A balanced design feels intentional and professional. It guides the eye and creates an emotional impact, which is exactly what you want from a high-impact display. These principles are simple, but they transform a random assortment of balloons into a cohesive piece of art.
Core Principles for Cohesive Designs
Applying a few key artistic concepts will dramatically improve your mixed-media balloon work. Think of these as your blueprint for creating visually pleasing and professional-looking displays.
| Design Principle | Application in Balloon Art | Impact on Display |
|---|---|---|
| Focal Point | Use the largest or most unique foil balloon as the main attraction. | It immediately draws the eye and gives the arrangement a clear center. |
| Balance & Weight | Distribute visual weight9 evenly. If you have a large foil on the left, add a cluster of medium foils or large latex balloons on the right. | Creates a sense of stability and harmony, preventing the design from looking lopsided. |
| Rhythm & Repetition | Repeat colors, shapes, or sizes throughout the garland. Use the same color in both your foil and latex balloons. | Ties the entire piece together, creating a cohesive and flowing look. |
| Scale & Proportion | Mix latex balloon sizes (5", 11", 18", 24"). This makes the organic garland look more natural and helps the foil balloons integrate better. | Adds texture, depth, and visual interest, making the display feel more dynamic and professional. |
How can you maximize the longevity of a mixed-media balloon display?
Your beautiful display looks great at first, but then it starts to wilt and deflate just hours later. It’s frustrating when your hard work doesn't last.
To maximize longevity, use high-quality, helium-grade latex balloons even when air-filling, as they have thicker walls. Keep the entire display indoors, away from direct sunlight and sharp objects. Properly sealing foil balloons and using secure tying techniques also prevents slow leaks and premature deflation.
As a manufacturer, I know that the lifespan of a balloon display starts with the quality of the balloon itself. But even the best balloons need the right conditions to thrive. For our large-scale retail partners, longevity is a key performance indicator. A display that lasts is a display that provides value. We've spent years perfecting not just our products but also the best practices for their use. A few simple precautions can easily double the life of your installation.
Extending the Life of Your Display
Beyond choosing quality balloons, your setup and environment are critical. Here are the professional tips I share with my clients to ensure their displays last as long as possible.
Environmental Control:
- Temperature: Avoid extreme heat or cold. Store and display balloons in a climate-controlled room10 (around 70°F or 21°C). Heat causes air inside balloons to expand, increasing the risk of popping, while cold causes them to shrink and appear under-inflated.
- Sunlight: Direct UV rays are the enemy of latex. They cause oxidation, which makes balloons look cloudy and brittle, leading to premature popping. Always place displays away from windows or use a UV-protectant spray11 like HI-SHINE for added defense.
Construction Techniques:
- Proper Inflation: Do not over-inflate your latex balloons. Inflate them to about 90% of their capacity to leave room for air expansion and reduce stress on the material.
- Secure Knots: Ensure every balloon is tied securely. For foils, make sure the self-sealing valve is completely flat. For latex, use strong knots or tie them in pairs. Slow leaks are the silent killer of balloon arrangements.
Conclusion
By mastering these weaving techniques, using the right tools, and applying key design principles12, you can create stunning, long-lasting displays that professionally integrate both foil and latex balloons.
-
Discover the versatility of 260Q twisting balloons and how they enhance balloon arrangements. ↩
-
Find out how balloon glue dots can help you achieve a professional finish in your displays. ↩
-
Learn how to elevate your balloon displays into stunning art pieces that captivate audiences. ↩
-
Understand the common causes of popped balloons and how to avoid them in your displays. ↩
-
Check out reviews and recommendations for electric inflators that save time and effort. ↩
-
Learn how fishing line can provide a strong, invisible structure for your balloon designs. ↩
-
Discover strategies for maintaining color consistency in your balloon arrangements. ↩
-
Learn how the Rule of Threes can enhance the visual appeal of your balloon displays. ↩
-
Learn about visual weight and how to balance it in your balloon displays. ↩
-
Find out how climate control can extend the life of your balloon installations. ↩
-
Explore how UV-protectant spray can help preserve the quality of your balloon displays. ↩
-
Understand essential design principles that can elevate your balloon art to the next level. ↩