How to create a balloon bouquet with latex balloons?
Making a balloon bouquet can seem tricky, but it is easier than you think. Do you want to add a personal touch to your next celebration? Learning how to craft your own beautiful balloon display1 is a rewarding process.
To create a latex balloon bouquet2, first, inflate your balloons and tie them with ribbon. Then, group the balloons together by tying their ribbons, or by using a balloon cluster tool3. Finally, attach the bouquet to a weight or decorative base. This guide will help you make stunning balloon bouquets for any event.

I have always enjoyed seeing the joy balloons bring. My experience at AIHUA BALLOON has shown me the impact of a well-made balloon display. I am excited to share my knowledge with you. This can help you create your own amazing balloon creations.
What are the essential materials needed for a DIY latex balloon bouquet?
Do you want to start making your own balloon bouquets but are unsure what you need? Gathering the right materials is the first step. Having all your supplies ready makes the process smooth.
The essential materials for a DIY latex balloon bouquet include quality latex balloons, a reliable balloon pump4, ribbon, and balloon weights5. You will also need scissors, and possibly a balloon tying tool6, to make the assembly easier.
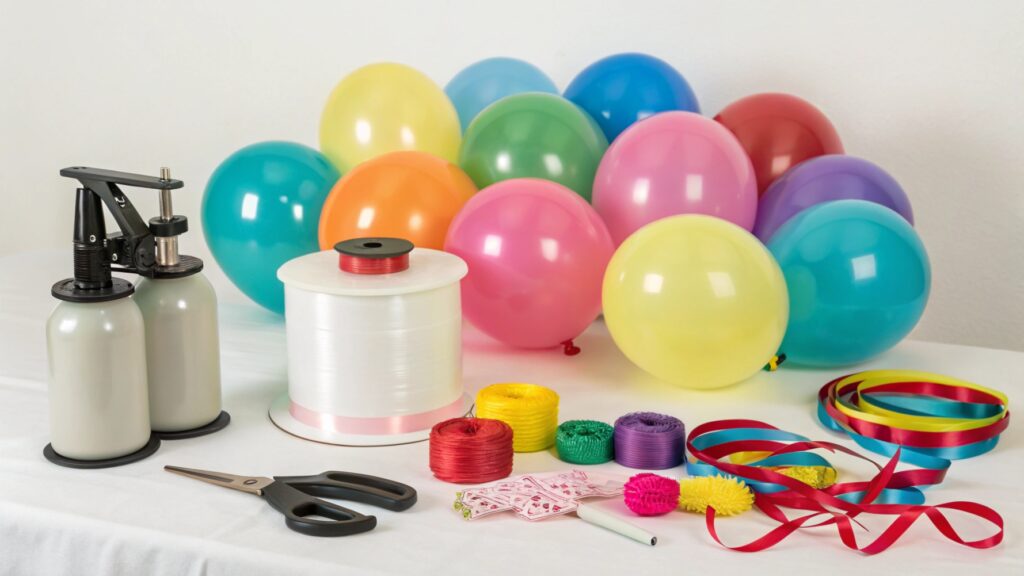
When I first started helping out at local events as a teenager, I realized gathering all the right items beforehand saved a lot of stress. At AIHUA BALLOON, we always emphasize using high-quality materials. This ensures the best results. Here is a breakdown of what you will need and why:
Essential Materials for Your Balloon Bouquet
| Material | Purpose |
|---|---|
| Latex Balloons | These are the main components. Choose good quality balloons. They inflate evenly and last longer. Poor quality ones can pop easily. |
| Balloon Pump | Manual or electric pumps are good. An electric pump saves time and effort, especially for many balloons. Hand pumps work for fewer balloons. |
| Ribbon | Curling ribbon or decorative ribbon works well. You need it to tie balloons. It also links them together. Choose colors that match your scheme. |
| Balloon Weights | These keep your bouquet from floating away. They come in many styles. Choose one that fits your event's theme. They provide stability. |
| Scissors | You need sharp scissors. Use them to cut ribbon. Also, use them to trim any excess material. |
| Optional: Tying Tool | This tool helps tie balloons easily. It prevents finger soreness. It is very useful if you are tying many balloons. It speeds up the process. |
| Optional: Sizing Chart | This helps inflate balloons to consistent sizes. Consistent sizes make the bouquet look professional. |
Make sure to select durable materials. This helps your bouquet last longer. Quality materials also ensure safety. As Vincent often reminds me, "Quality isn't just a word, it's the foundation of everything we do."
How can I select and combine different latex balloon colors and sizes for an attractive bouquet?
Do you wonder how to make your balloon bouquet truly stand out? The key is choosing the right colors and sizes. This can make a big difference in the final look.
To select and combine different latex balloon colors and sizes for an attractive bouquet, choose colors that complement each other or fit your event's theme. Varying balloon sizes adds depth and interest. Use larger balloons as a base, with smaller ones to fill gaps.

I have seen countless balloon displays at trade shows and customer events. The most attractive ones always have a good mix of color and size. A successful bouquet tells a story. It also creates a mood. Here are some tips I have learned from my time in the industry:
Tips for Color and Size Selection
-
Color Harmony:
- Monochromatic: Use different shades of one color (e.g., light blue, medium blue, dark blue). This creates an elegant look.
- Complementary: Pair colors opposite each other on the color wheel (e.g., blue and orange, purple and yellow). These create a vibrant contrast.
- Analogous: Choose colors next to each other on the color wheel (e.g., blue, green, and yellow). This gives a harmonious, calming effect.
- Themed: Pick colors that match your event. For a baby shower, use pastels. For a holiday, use traditional colors.
-
Size Variation:
- Base Balloons: Use larger balloons (11-12 inches) as the main part of your bouquet.
- Filler Balloons: Add smaller balloons (5-9 inches) to fill spaces. These add fullness and texture.
- Accent Balloons: Sometimes, a single jumbo balloon (24-36 inches) can be a focal point. Balance it with smaller ones.
-
Rule of Odds: Arrange balloons in odd numbers (3, 5, 7) for a more visually pleasing look. This often feels more natural and balanced.
-
Texture: Consider different finishes like matte, metallic, or pearlized. Mixing textures can add a sophisticated touch.
I always suggest holding the balloons together before inflating. This helps visualize the final outcome. My colleagues at AIHUA BALLOON, especially those in design, spend a lot of time perfecting these combinations.
What are the best techniques for inflating and sealing latex balloons7 to ensure a long-lasting bouquet?
Are you worried about your balloons deflating too quickly? Proper inflation and sealing methods are crucial. They ensure your beautiful bouquet lasts for your entire event.
The best techniques for inflating latex balloons8 involve using a quality pump and not over-inflating them. To seal, twist the neck of the balloon several times, then tie a secure knot as close to the balloon base as possible. Using a balloon tying tool can make this process easier and more consistent.
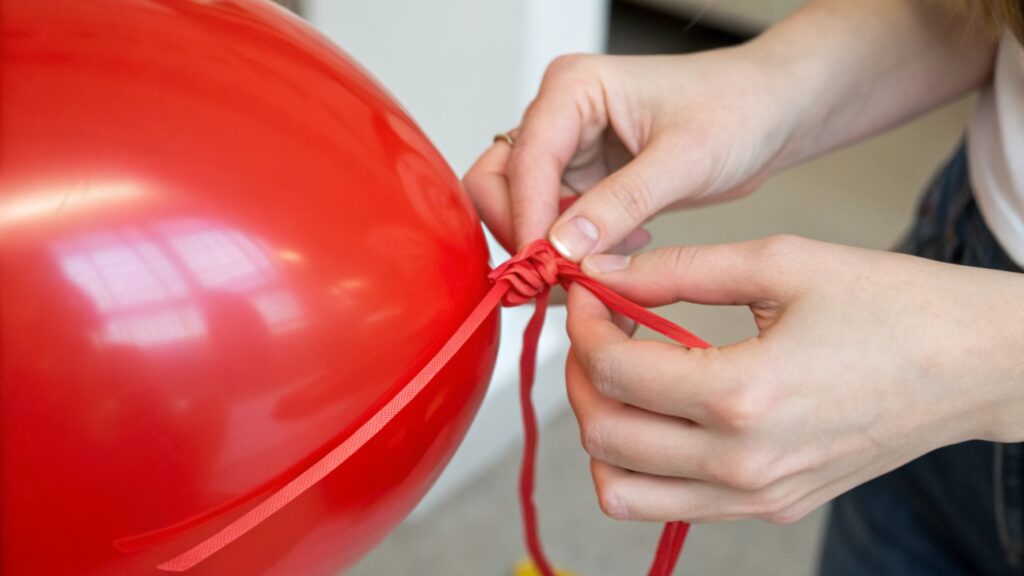
Ensuring balloons last is something we focus on greatly at AIHUA BALLOON. Vincent often says, "A balloon's longevity starts with how it is handled." I have learned that correct inflation and sealing are key. Over-inflation can lead to early popping. Under-inflation leads to fast deflation. Here are the steps I follow:
Best Practices for Inflation and Sealing
-
Inflation:
- Use a Pump: Always use a balloon pump. It makes inflation faster. It also helps against germs.
- Proper Size: Inflate balloons to their recommended size. Do not over-inflate. Over-inflating strains the latex. This makes the balloon pop faster. It also makes it lose air quicker.
- Even Inflation: If using a sizer, inflate all balloons of the same intended size to that exact measurement. This gives a uniform look.
- Air vs. Helium: For floating bouquets, use helium. For non-floating ones, use air. Air-filled balloons last much longer than helium-filled ones.
-
Sealing (Tying):
- Stretch the Neck: After inflating, stretch the balloon's neck. This makes tying easier.
- Wrap and Knot:
- Wrap the neck around two fingers.
- Pull the end through the loop you made.
- Pull tight to form a secure knot.
- Close Knot: Make the knot as close to the balloon's base as possible. This stops air from escaping from the unknotted portion.
- Tying Tool: If tying many balloons, use a balloon tying tool. It protects your fingers. It ensures consistent, tight knots.
-
Pre-stretch (optional): Lightly stretch a new balloon before inflating. This helps the latex become more flexible. It also helps it inflate more evenly. Some find this helps with longevity.
Proper inflation and a tight knot are very important. They ensure your efforts lead to a beautiful, lasting display. My team at AIHUA BALLOON emphasizes this to maintain the quality our customers expect.
How do you assemble and arrange latex balloons on a stand or weight to form a cohesive bouquet?
Do you have your inflated balloons and now need to arrange them? Assembling your bouquet neatly makes it look professional. It ensures your hard work pays off.
To assemble and arrange latex balloons on a stand or weight, first, group balloons into clusters. Then, attach these clusters to a central ribbon or anchor them directly to a balloon weight or stand. Vary the height of each balloon to create a layered, cohesive look.
[^2] on a decorative weight](https://aihuaballoon.com/wp-content/uploads/2025/07/description-a-completed-balloon-bouquet-anchored--1024x577.jpg)
I remember one time preparing for a large display, I needed to arrange hundreds of balloons. That experience taught me the value of a systematic approach. A well-arranged bouquet commands attention. It also effectively conveys your message. Here is how I approach assembly:
Assembling Your Cohesive Bouquet
-
Step 1: Cluster Balloons:
- Pairs (Duplets): Inflate two balloons to the same size. Tie their necks together. This creates a basic unit.
- Quads (Quads): Make two duplets. Twist them together to form a four-balloon cluster. This is a common starting point for bases.
- Creating Varying Lengths: For each balloon, cut a long piece of curling ribbon. Tie one end to the balloon's knot. The varying lengths will give you control over height.
-
Step 2: Start the Base:
- Balloon Weight: Place the chosen balloon weight on your work surface.
- First Set: Take your longest ribbons or your largest balloons. Tie them directly to the balloon weight. Or, tie them to a central, stronger ribbon that is secured to the weight. These will be the lowest part of your bouquet.
-
Step 3: Build Up Layers:
- Gradual Heights: Add balloons with slightly shorter ribbons. Attach them to the weight or central ribbon.
- Staggering: Do not put all balloons at the same height. Stagger them. This creates depth. It also makes the bouquet look fuller.
- Filling Gaps: Rotate the bouquet as you add balloons. This helps see empty spaces. Add smaller balloons or those with medium ribbon lengths to fill these gaps.
-
Step 4: Secure and Adjust:
- Tighten Ties: Ensure all knots and ties are secure. You do not want balloons to slip.
- Ribbon Management: Once happy with the arrangement, gather all the balloon ribbons. Tie them together in a secure knot at the base. You can then curl the excess ribbons for decoration.
- Final Adjustments: Step back and look at your bouquet. Adjust any balloons that are out of place. Ensure it looks balanced and cohesive from all angles.
A well-assembled bouquet feels robust. It also looks professional. This method creates a balanced and visually appealing display every time.
Conclusion
Making a latex balloon bouquet2 is simple with the right tools and steps. Inflate and tie balloons securely. Choose good colors and sizes. Then, arrange them well on a weight. You will have a beautiful display.
-
Learn the key elements that contribute to a stunning balloon display. ↩
-
Explore this resource to learn the basics of creating stunning latex balloon bouquets for any occasion. ↩ ↩
-
Discover how a balloon cluster tool can simplify your bouquet-making process and enhance your designs. ↩
-
Explore the different types of balloon pumps to find the best one for your balloon inflation needs. ↩
-
Learn about the significance of balloon weights in keeping your bouquets stable and visually appealing. ↩
-
Find out how a balloon tying tool can save you time and effort when creating balloon bouquets. ↩
-
Learn effective sealing techniques to ensure your balloons stay inflated longer. ↩
-
Get expert tips on how to inflate latex balloons properly for a long-lasting bouquet. ↩